


Capturing the awe-inspiring beauty of the Northern Lights is a dream for many photographers and non-photographers alike. Whether you have a smartphone or a professional camera, this guide will provide you with valuable tips and techniques to help you capture the best possible photos of this mesmerizing natural phenomenon. In this article, we will explore tips for both smartphone and professional camera users, as well as suggestions for taking self-portraits with the Northern Lights.
Remember your EYES will not see them the way your camera will. I will tell you how I found and shot them below
Tips for Smartphone Users For Shooting Northern Lights:
a. Use a tripod or a stable surface: To avoid camera shake during long exposures, stabilize your phone by using a tripod or placing it on a steady surface. Most people have ring lights these days, you can for sure use that.
b. Long exposure mode: If your phone has a long exposure mode, activate it to capture the Northern Lights’ ethereal movement. This mode can usually be found in the drop-down options or camera settings. It will usually look like the symbols +-
c. Adjust exposure: Increase the exposure to capture more details and enhance the vibrancy of the Northern Lights. You can adjust the brightness and saturation settings in your phone’s photo editing app.
Tips for Professional Cameras For Shooting Northern Lights
a. Use a tripod: Stability is crucial for long exposures. Invest in a sturdy tripod to keep your camera steady during the extended exposure time required for capturing the Northern Lights.
b. Low ISO setting: Set your ISO to the lowest possible value (e.g., ISO 100) to minimize noise and retain image quality.
c. Overexpose for landscape details: Overexposing the image slightly will help capture the intricate details of the landscape surrounding the Northern Lights.
d. Optimal aperture: Select an aperture between f/8 and f/14 to ensure sharpness and maximize depth of field.
e. Wide-angle lens: Utilize the widest lens available to capture a broader view of the Northern Lights. A lens with a focal length around 15mm is ideal, but wider options such as 24-70mm can also be used effectively.
f. Shutter priority or manual mode: Set your camera to shutter priority or manual mode to manually control the exposure time. Start with a 30-second exposure and experiment with longer durations for desired effects.
g. Observe movements: Pay attention to the direction of movements in front of your lens to capture dynamic and visually appealing long exposure effects.
h. Bulb mode: If needed, utilize bulb mode to have control over extended exposure times that exceed the camera’s predefined limits.
i. Shoot in RAW format: Capture images in RAW format to retain maximum flexibility and detail during post-processing.
Tips for Self-Portraits Under The Northern Lights:
a. Set lens to infinity mode and manual focus: Ensure that your lens is set to infinity focus and switch to manual focus mode for sharpness.
b. Utilize flash: Use a flash to freeze time and add dramatic lighting effects to your self-portraits. Place one flash behind you and another in front of you for balanced illumination. If you have only one flash, position it in front of you. DON’T NOT USE JUST A REGULAR LIGHT AS IT WILL RUIN YOUR PHOTO
c. Experiment and have fun: Take advantage of the long exposure to create unique and creative self-portraits amidst the Northern Lights’ magical backdrop.
How I Was Able To Take The Best Photos Of The Northern Lights
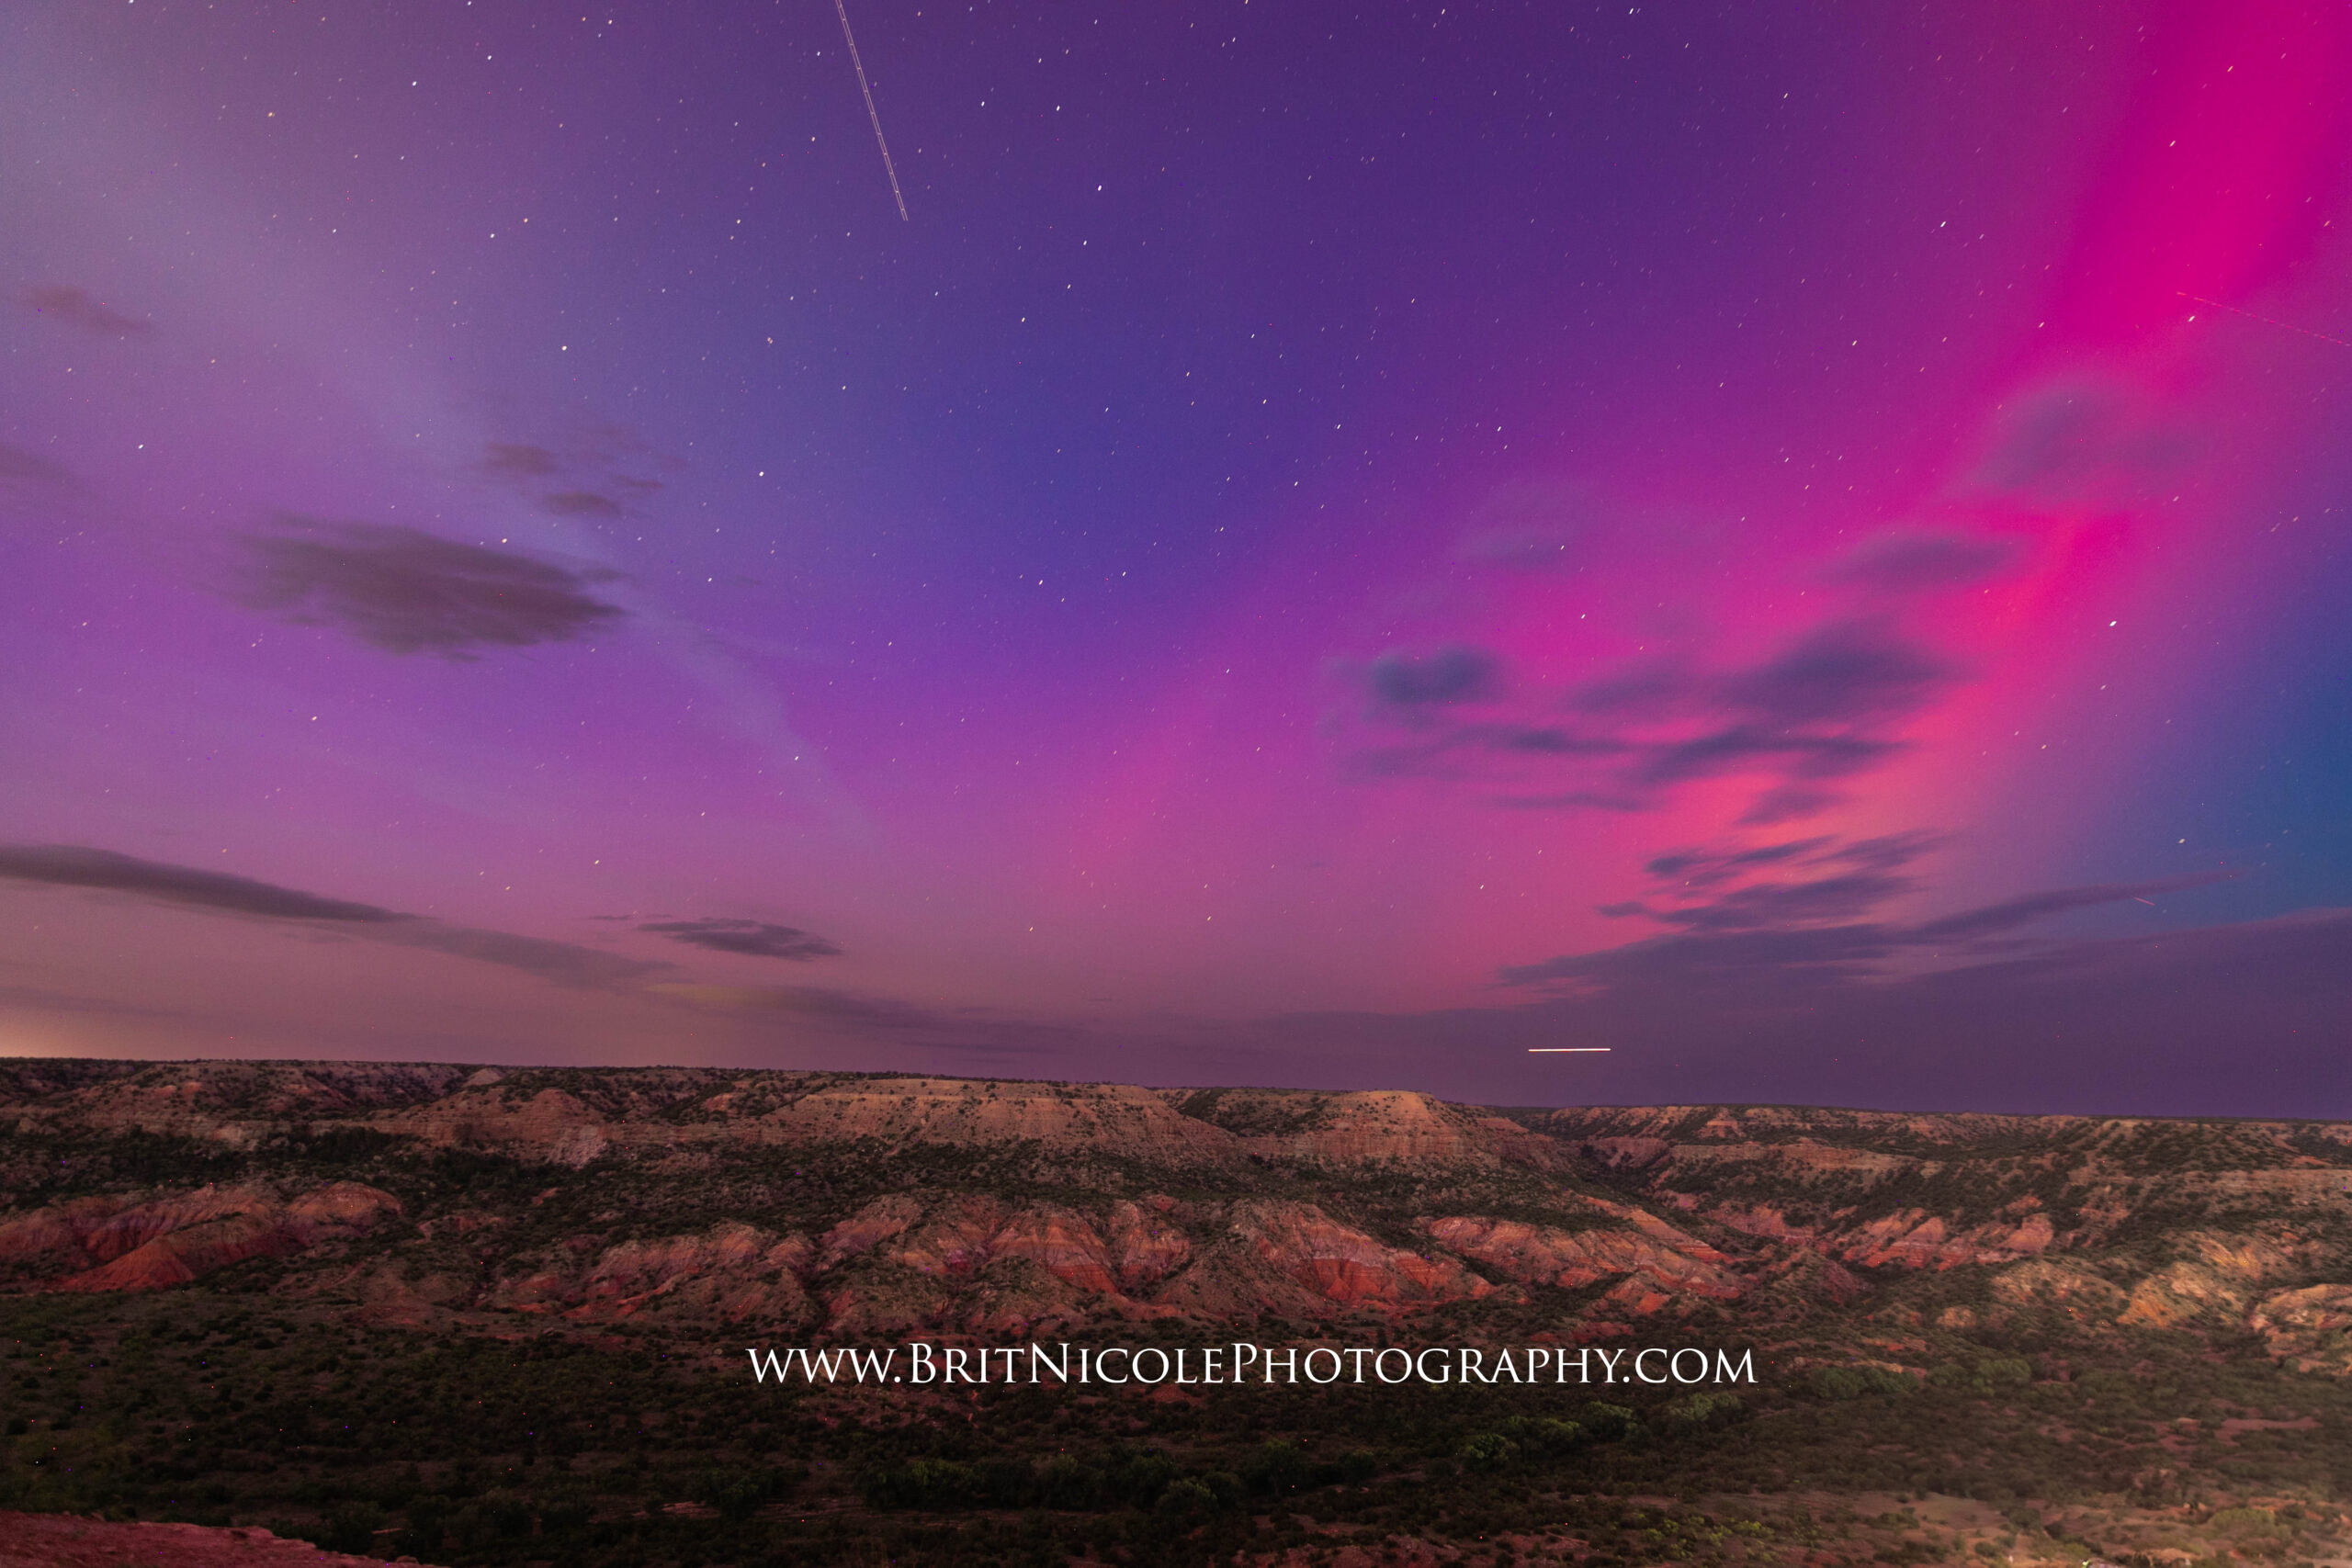
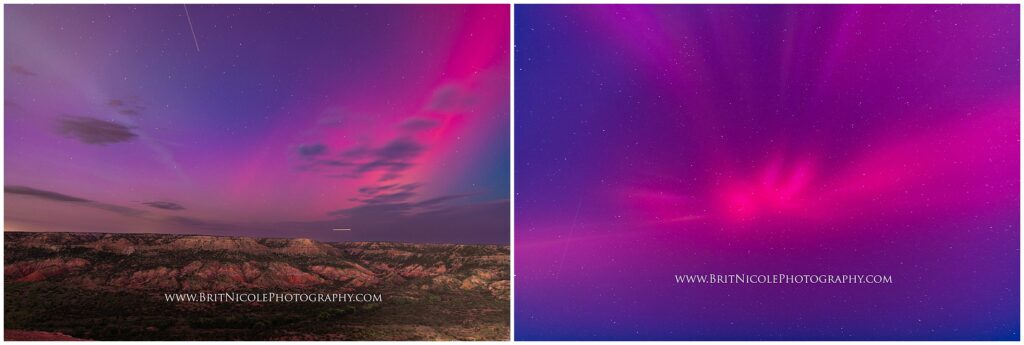
In Palo Duro Canyon Texas
To kick off my thrilling Northern Lights photography adventure, I relied on my trusty sidekick, the Aurora app on my phone. It’s like having a cosmic alarm clock that jolts me awake with excitement whenever the KP index is off the charts, no matter where I find myself on this Earth. I’ve become quite attached to this app, especially during my Icelandic elopement escapades, where it proved to be an indispensable tool for tracking those mesmerizing light shows for my clients. And let me tell you, it’s a lifesaver when you’re a wanderlust-driven photographer always on the go.
With the KP index projected to hit an impressive level of 8 (that’s considered HIGH, my friend) between 10 pm and 11 pm, followed by a gradual descent after 11:30 pm, I knew it was time to act. But Mother Nature can be quite capricious in the Texas Panhandle, so I whipped out my weather app to scout for the perfect spot with minimal cloud coverage. And voila! Palo Duro Canyon, the United States’ second largest canyon, beckoned me with open arms. I practically have a VIP backstage pass to this canyon, having shot countless adventure elopements and family photos here, so I knew exactly where I wanted to go to get the depth of the canyon plus the least light pollution. The spot I picked was the place, where I could face East and West, was perfect.
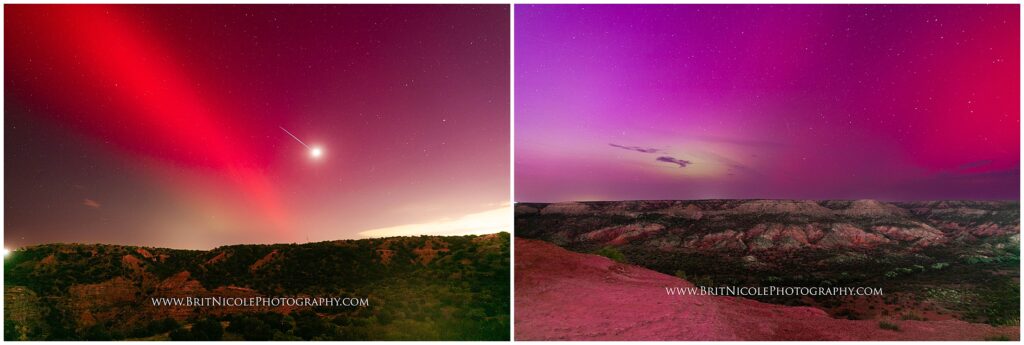
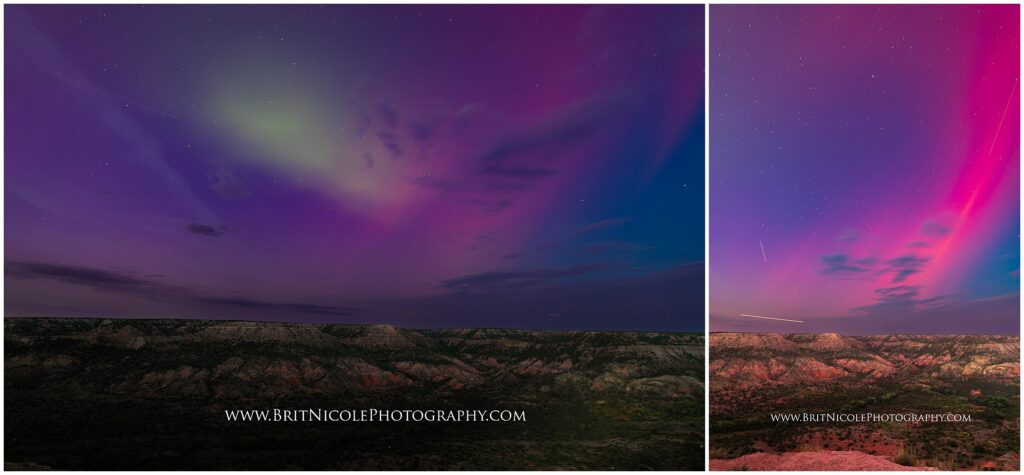
As the sun began its fiery descent, painting the sky with hues of pink and orange, I kept my eagle eyes peeled for those whimsical cloud formations. You know, the kind that looks like an abstract painter went wild with their brush, leaving behind long and streaky strokes across the sky. To my naked eye, the looked like regular weird clouds. With my camera settings dialed in and ISO set at a crisp 100, I started practicing long exposures towards the East around 9 pm. Lo and behold, the sky came alive with vibrant shades of green and purple, as if the universe was teasing me, saying, “You’re in for a treat, my friend.”
But patience is a virtue, my fellow light chasers. So, I settled in and waited, watching the night unfold before my lens. Then, the moment arrived—the time to push my photography boundaries and let my creative spirit soar. I cranked up the ISO from 100 to a daring range of 800 to 1600, intentionally nudging the exposure to a little overexposed territory (+1). Why, you ask? Well, my aim was to capture all the intricate details of the canyon, every nook and cranny, while keeping my aperture locked at a sweet f/8 to ensure those images were razor-sharp and crystal-clear.
Armed with my trusty Canon Mark IV and my faithful sidekick, the 24-70mm lens, set to infinity focus, I set out to conquer the night sky. Sure, I might have daydreamed about having a fancy 15mm lens in my arsenal, but hey, you work with what you’ve got, right? And boy, did I make those shots count!
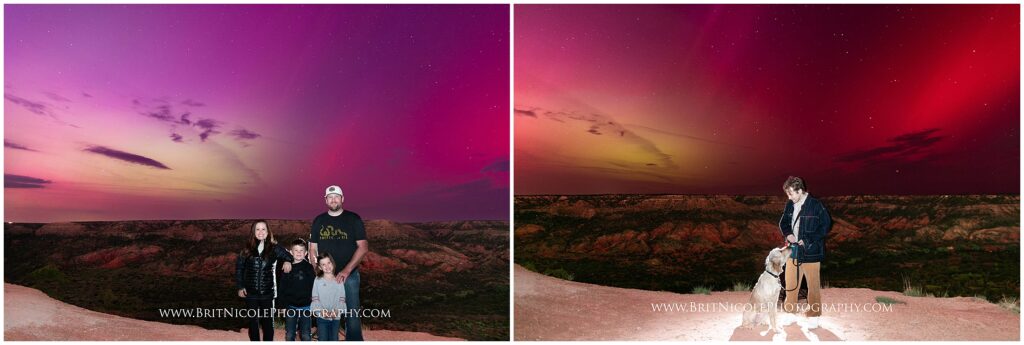
Now, let’s talk about capturing those heartwarming family moments amidst the ethereal glow. I harnessed the power of not just one, but two flashes. These bad boys freeze time and bring a touch of magic to the scene. But mark my words, my friend, these flashes are the real deal—dedicated flashes designed for this kind of sorcery. I positioned one flash behind us, casting a gentle glow to prevent us from disappearing into the canyon’s shadows. In front of us, I placed the other flash, ready to illuminate our faces with just the right amount of light. To avoid blinding ourselves, I set both flashes to a modest power of 1/32. Gotta strike that perfect balance, you know?
Let’s not forget the delightful encounters we stumble upon during our photographic exploits. Along the way, I happened upon a fellow adventurer from Dallas and his furry companion—a guy and his puppers. My Canon app decided to take an impromptu break, so I boldly asked this kind soul to lend a hand and press the shutter button for us. And being the kindhearted gentleman he was, he gladly obliged. In return, I immortalized him and his four-legged buddy in a photograph, capturing their shared joy in this magical once in a lifetime encounter.
Capturing the Northern Lights can be an exhilarating and rewarding experience. By leveraging technology, understanding your equipment, and experimenting with different techniques, you can immortalize the beauty of this natural phenomenon in stunning photographs. But you have to rely on your weather apps and be in DARK places with no light pollution in order for it to work. Don’t rely on facebook to tell you unless that person knows what they are talking about.


View comments
+ Leave a comment